Now that the battery pack has arrived I can now think about making this mobile.
Before I get on to connecting up the battery, I need to make the display script start up automatically, since when it is out and about it wont have a keyboard attached in order to load the script.
Running scripts on startup can be achieved in a number of ways. I wish I could find a decent article somewhere that descripbes all the different methods and why you might choose one over the other. I have in the past modified the .profile file within the user's home folder, but in this case I need to run scripts using sudo, and I haven't been able to do that using the .profile. Therefore what I've done is used the guide from here. First I created a new file called rungui.
sudo nano /etc/init.d/rungui
and put this text into it
#! /bin/sh
# /etc/init.d/rungui
### BEGIN INIT INFO
# Provides: noip
# Required-Start: $remote_fs $syslog
# Required-Stop: $remote_fs $syslog
# Default-Start: 2 3 4 5
# Default-Stop: 0 1 6
# Short-Description: Simple script to start a program at boot
# Description: A simple script which will start / stop a program a boot /$
### END INIT INFO
echo 'called rungui script'
sudo killall gpsd
sudo gpsd /dev/ttyUSB0 -F /va
sudo python /home/pi/test_gui3.py
exit 0
The important lines are at the bottom
The two lines that refer to gpsd have been added since for some reason my GPS has stopped working unless you do this on every boot. I have no idea why, I don't think I have changed anything since I first got this working, but eventually I found I could fix it with these two lines. So I'm calling them on every boot of the pi.
The script is then called suing python /home/pi/test_gui3.py. I should probably rename that something sensible at some point.
Once this file is created run:
sudo update-rc.d rungui defaults
and the script should be launched automatically when the pi boots.
For the GPS integration, the articles from Kevin Townsend have been invaluable. The hardware I'm using is the Ultimate GPS Breakout Board. Mine was from Cool Components in the UK.
As per the suggestion in Kevin's article I'm also using a USB to serial converter rather than using the GPIO pins directly. I got this from Amazon UK (http://www.amazon.co.uk/gp/product/B008AGDTA4)
This worked just by plugging it into the Raspberry Pi and is accessible probably as:
/dev/ttyUSB0
The instructions on Kevin's page are really comprehensive so I wont repeat them here. The only mistake I made was in connecting the GPS breakout to the serial.
The coloured cables from the USB to serial are:
Red VCC
Black GND
Green TXD
White RXD
Everytime I do something with serial I do this wrong, and it is completely logical I just seem to do it wrong every time! The TXD from the USB to serial needs to connect to the RX on the GPS breakout. I've put a picture below. Sorry the cables for TX and RX are both yellow, it doesn't help with the understanding but it's all I had.
Once you get it all working, on the Raspberry Pi if you run
# coding=UTF-8 import pygame import sys import datetime import gps def draw_borders(screen): """Draws some simple borders to the display""" pygame.draw.lines(screen, (255, 255, 255), False, [(0, 30), (width, 30)], 2) def draw_time(screen): """Draws the time to the display""" the_time = datetime.datetime.now() time_as_string = the_time.strftime('%H:%M') font = pygame.font.Font(None, 42) text = font.render(time_as_string, 1, (255, 255, 255)) textpos = text.get_rect(centerx=screen.get_width()/2, centery=15) screen.blit(text, textpos) # paste the text into the background def draw_speed(screen, the_speed): """Draws the speed to the display""" # get the speed... if the_speed: the_speed_string = '{} kph'.format(int(the_speed)) # display as whole number else: the_speed_string = '-- kph' font = pygame.font.Font(None, 160) text = font.render(the_speed_string, 1, (255, 255, 255)) textpos = text.get_rect(centerx=screen.get_width()/2, centery=screen.get_height()/2) screen.blit(text, textpos) # paste the text into the background def draw_altitude(screen, the_altitude): """Draws the altitude to the display""" if the_altitude: the_altitude_string = '{} m'.format(the_altitude) else: the_altitude_string = '-- m' font = pygame.font.Font(None, 65) text = font.render(the_altitude_string, 1, (255, 255, 255)) textpos = text.get_rect(centerx=120, centery=screen.get_height()-20) screen.blit(text, textpos) # paste the text into the background def draw_temp(screen): """Draws the temperature to the display""" the_temp = 0 the_temp_string = u'{}°C'.format(the_temp) font = pygame.font.Font(None, 65) text = font.render(the_temp_string, 1, (255, 255, 255)) textpos = text.get_rect(centerx=screen.get_width()-80, centery=screen.get_height()-20) screen.blit(text, textpos) # paste the text into the background if __name__ == '__main__': pygame.init() size = width, height = 650, 400 black = 0, 0, 0 screen = pygame.display.set_mode(size) # set up gps if possible gps_session = gps.gps("localhost", "2947") gps_session.stream(gps.WATCH_ENABLE | gps.WATCH_NEWSTYLE) speed = None altitude = None while True: # Checks for key presses, e.g. escape to quit for event in pygame.event.get(): if event.type == pygame.QUIT: sys.exit() if event.type == pygame.KEYUP and event.key == pygame.K_ESCAPE: sys.exit() # Fill the screen with black background screen.fill(black) # get GPS data gps_report = gps_session.next() altitude_temp = gps_report.get('alt') speed_temp = gps_report.get('speed') # need to do this temp stuff otherwise it flickers # back to '--' if gps is temporarily lost if altitude_temp: altitude = altitude_temp if speed_temp: speed = speed_temp # Draw all the stuff draw_borders(screen) draw_time(screen) draw_speed(screen, speed) draw_altitude(screen, altitude) draw_temp(screen) # Update the display pygame.display.flip()
And the output:
I haven't been able to test the speed yet until I get a battery pack, but you can see that the altitude has been updated.
It is also worth looking at the other details that are stored within the gps_report variable. The Python dictionary keys are in italics.
longitude lon
latitude lat
time time
altitude alt (m)
speed speed (kph)
climb climb (m/min)
heading track (degrees) (I think)
Might be able to add more of this information in later.
This posts describes the construction of a basic display with some placeholders.
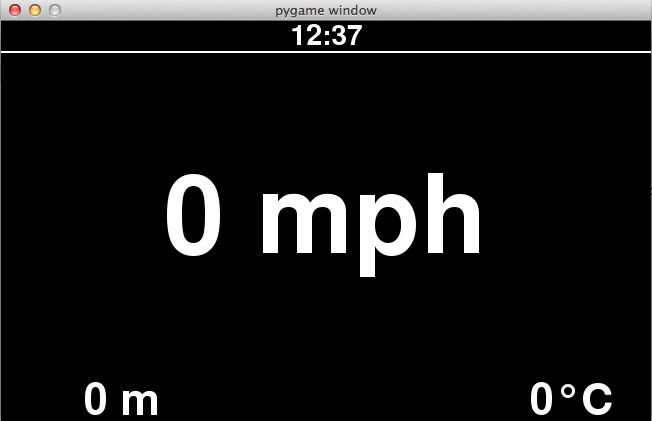
The idea is to produce something like this that displays the speed, altitude and temperature.
I'm using a Raspberry Pi and I want to avoid booting into the GUI so I need a way of creating a graphical display from the terminal display. I discovered that this is possible using Python and PyGame.
I think this was already installed but in case it isn't, the easiest thing to do is use aptitide to install python setup tools and then you can install any packages you want.
then you can use pip to install other Python packages e.g. PySerial
sudo pip install pyserial
So to create the display I'm going to use PyGame. This may not be the most sensible thing to do, but it does seem to work. Alternative suggestions welcome.
I used a PyGame tutorial from Pete Shinners to get me started, which was very helpful.
This first version of the display creates some text in fixed positions in the display as placeholders until I can actually start reading some data. There are also a lot of hard coded positions , which at the moment doesn't matter because it is set up to be displayed on the MyVu glasses.
# coding=UTF-8 import pygame import sys import datetime def draw_borders(screen): """Draws some simple borders to the display""" pygame.draw.lines(screen, (255, 255, 255), False, [(0, 30), (width, 30)], 2) def draw_time(screen): """Draws the time to the display""" the_time = datetime.datetime.now() time_as_string = the_time.strftime('%H:%M') font = pygame.font.Font(None, 42) text = font.render(time_as_string, 1, (255, 255, 255)) textpos = text.get_rect(centerx=screen.get_width()/2, centery=15) screen.blit(text, textpos) # paste the text into the background def draw_speed(screen): """Draws the speed to the display""" # get the speed... the_speed = 0.0 the_speed_string = '{} mph'.format(int(the_speed)) # display as whole number font = pygame.font.Font(None, 160) text = font.render(the_speed_string, 1, (255, 255, 255)) textpos = text.get_rect(centerx=screen.get_width()/2, centery=screen.get_height()/2) screen.blit(text, textpos) # paste the text into the background def draw_altitude(screen): """Draws the altitude to the display""" the_altitude = 0 the_altitude_string = '{} m'.format(the_altitude) font = pygame.font.Font(None, 65) text = font.render(the_altitude_string, 1, (255, 255, 255)) textpos = text.get_rect(centerx=120, centery=screen.get_height()-20) screen.blit(text, textpos) # paste the text into the background def draw_temp(screen): """Draws the temperature to the display""" the_temp = 0 the_temp_string = u'{}°C'.format(the_temp) font = pygame.font.Font(None, 65) text = font.render(the_temp_string, 1, (255, 255, 255)) textpos = text.get_rect(centerx=screen.get_width()-80, centery=screen.get_height()-20) screen.blit(text, textpos) # paste the text into the background if __name__ == '__main__': pygame.init() size = width, height = 650, 400 black = 0, 0, 0 screen = pygame.display.set_mode(size) while True: # Checks for key presses, e.g. escape to quit for event in pygame.event.get(): if event.type == pygame.QUIT: sys.exit() if event.type == pygame.KEYUP and event.key == pygame.K_ESCAPE: sys.exit() # Fill the screen with black background screen.fill(black) # Draw all the stuff draw_borders(screen) draw_time(screen) draw_speed(screen) draw_altitude(screen) draw_temp(screen) # Update the display pygame.display.flip()
And what this produces is:
You can see that this is actually being run on a Mac, which is good for editing the display layout, maybe doing some keyboard based control later, but the actual display needs to run on the Pi connected to the glasses.
You can see the same here being displayed in the glasses.
As a side note, I'm actually getting the code onto the Pi by copying it to a public dropbox folder and downloading with wget. I'm doing a lot of this through SSH-ing into the Pi, but I don't know how to start the script from the remote login and have the display update on the glasses that are connected via composite. Please let me know if you know if this is possible. You can just about hear from the video that I have a keyboard connected the the Pi in order to run the Python script.
I also had to mess around quite a lot with the resolution of the display. If the MyVu didn't like the resolution I would get a blank screen inside the glasses and couldn't get rid of it without restarting the Pi. The line configuring the PyGame display:
size = width, height = 650, 400
isn't the maximum resolution that I could probably use, but it does work.
What I'm going to first is just think about some of the components. I'm ignoring all the sensors here which wil get added as we progress.
Display
In terms of the display what I have lying around is a pair of MyVu Solo Plus video display glasses. I think mine were from e-bay for about £35. It is definitely possible to pull the LCDs out of these glasses because it's been done on Hack a Day. For now I'm going to leave the LCDs inside the MyVu though.
For processing data, running the display etc. I think I'm going to use a Raspberry Pi (at least for now). It will output composite display, which is what the MyVu wants. It should also be very easy to program, and allow connection of other sensors. In addition to the Pi, as standard I tend to get an Edimax Nano USB Wifi dongle, just becasue it makes interaction with the Pi easier (mine was from Amazon).
So this is the first post in this wearable computing blog. I got this idea when I was looking for a cheap pair of goggles for my first trip snowboarding. Unsurprisingly this research turned into an internet wandering into the most expensive and gadget ridden goggles that are available!
This led me to Recon Instruments (http://reconinstruments.com/products/snow-heads-up-display), who sell a heads-up-display for skiing or snowboarding that can provide information such as speed, jump airtime, etc. though built-in GPS. It can also connect to your smartphone via bluetooth.
While I would love a pair of these goggles as they look amazing (particularly when there is an SDK), for a first trip, they seem a little extravagant. Nevertheless, being a bit a geek, it did make me wonder about how close I could get to this functionality with some DIY hacking.